


Showing posts with label Guide. Show all posts
Showing posts with label Guide. Show all posts
Sunday, November 14, 2010
Ragnarok Online Renewal Guide

So, yeah, Renewal isn't just about 3rd jobs
Basically, it's a complete game system change, hence the name "Renewal".
Now, it's more of a good game balancing of sorts and this guide will be for total newbies of the game and for long time returning players who don't research about stuff. But of course, I'll start with the newbie guide...
The Novice Training Grounds
Basically, when you start the game after creating a new character, you'll be starting at the Novice training grounds. Upon arriving, you'll see an NPC named Sprakki near you, talk to her and she'll ask you to go across the bridge and she'll be waiting inside the training quarters.

You'll then get a notice of a new quest, quests are an essential part of Ragnarok's story guide or at times just for items/exp, you'll be able to track some of the quests at renewal by pressing Alt+U, double click on the quest name to see your current goal. Now, do as she says and head to your right and enter the portal between the guards. You will find Sprakki again, talk to her and she'll reward you with some exp and give an option to start training or directly jump to the world of Ragnarok.

Now, for totally complete starters, choose to start training instead since this whole process will reward you with a number of beneficial items and exp. Once you sign up, you'll be transferred inside, and you'll see another npc named Brade, talk to him, read and do as he says, he'll give you novice gears which will be useful in your stay at the training grounds, he'll ask you to equip them and do so by opening your item window (Alt+E) and selecting the equip tab, double click the items to equip them.

Once you equip, talk to Brade again, and he'll reward you with exp and ask you to talk to Jinha to learn your active skill, First Aid, Jinha is just in the 1 o'clock direction of Brade, talk to her and learn the skill, then return to Brade.

After talking to Brade, he'll again reward you with some exp and ask you to go to Chocolat, from Brade's location, go to your left and enter the portal, talk to Chocolat there and she'll ask you to learn a thing or two from different people you'll get familiarized with when you're in the real game world already.


Now Chocalat will ask you to talk to the npcs above her and then report to her what you've learned, you can read them as they're useful guides if you're a total beginner in this game. Talk to Kafra first after Chocalat's first instruction, after talking to Kafra, talk with Chocolat again and she'll ask you to talk to Zanda this time, do the same until you're done with the Soldier and Chocolat will now warp you to the real Training Grounds.


Now this will be your first encounter with monsters, but wait, talk to Brade first as he's here once again.

Brade will then ask you to slay a Poring. Now look for the game's mascot, Poring, a pink cute critter which should be dead in one attack if you've equipped the novice knife.

After doing so, talk to Brade and he'll reward you again with exp, a novice cutter and some novice potions. Now, choose to stay at the Training grounds for a while. And level your base level to at least 12 and max your job level to 10 and then max your basic skills. Now in your leveling process, you'll see an NPC named trainer, if you talk to him and choose the 2nd option, you'll be transferred to a similar map with slightly stronger monsters which will help you level fast enough. Choosing the 1st option will warp you back to the map with the weaker monsters.


Now, there's still bonuses here, see the line of NPCs near Brade, talk to the Swordsman, Thief, Merchant and Mage NPCs, and you'll see a third option with the word "quest" in the option, select it and you'll receive a new quest.


Swordsman


Thief


Merchant


Mage
Now, the tasks for these quests are quite easy and will reward you with good exp. Swordsman will ask you to kill 2 Picky monsters, Thief will ask you to kill 5 Willows and get a Tree Root, Merchant will ask you to earn 300 zennies and Mage will ask you to kill 5 Lunatics. Lunatic are found the weak monsters map while Picky and Willow can be found in the other. Remember that you can track your quest in the Quest Window (Alt+U) to see your progress.

For the Merchant quest, you'll see an NPC near the Trainer, which gives a buy/sell window, you can sell your loots until you get 300 zennies to clear the quest here.


After completing the quests, talk back to the respective NPCs and select the Quest option again and you'll be rewarded with exp and some items. Now, seriously reach base level 12 and if your choice is one of the 6 basic first jobs (Swordsman, Thief, Merchant, Acolyte, Mage, Archer) just talk to the respective NPC and pick the I want to be *insert job here* option and confirm it, you'll be directly warped to the guild of the chosen job.


Upon arriving, talk to the Guildsman and pick the job change option and you'll instantly be changed to your desired job. And this ends the Novice guide.
The Eden Group
Now part 2 for the newbie guide would be the addition of the Eden group on Renewal, basically the reason why I advise level 12 was to access the quest of this immediately. In many towns, you'll see a novice-like elf NPC named Eden teleport officer.

Talk to the npc and choose to move to the Eden group. Upon entering, move forward and talk to the Secretary, choose to join the group and you'll be prompted with a typing area, just type anything. You'll be asked to do this twice.


After the second type area, you'll be rewarded with the Eden badge. This is a 0 weight, non-sellable, non-transferable item btw.

Now if you're around at least level 12, talk to Boya and choose "what is your responsibility" option and agree to proceed with his training. This will now be marked in your quest log.


Now just do the quest and once you complete it, you'll be asked to report to Boya. Do so and talk to Boya and he'll say that your equipments are ready. Once done head to the blue gate near the bulletin boards and talk to it, you'll now have permission to enter it.


Once inside, head to the upper right portal, talk to the only NPC there and choose to take the suppliers and say that you have weight, make sure you are not carrying too many items.


Once you're done, you'll be rewarded with a good starters gear which has really good defense rates and effects as well. You can do this process two more times when you're at level 26-40 and 41+. Note that once you forgot to start the quest in the two earlier level caps (12-25 and 26-40), you won't be able to do it anymore. After doing the 2 later quests, you'll be given upgraded versions of the Eden set; these equipment sets are non-transferable and have 0 weight. An incomplete walkthrough of the Eden quest can be found in the iRO quests wiki.
One last note is that the bulletin boards have level caps assigned to them, while you're inside in the level cap, you can select it and choose quests to complete which will reward you with extra exp once you complete them.

Now that newbie guide is done, here's more interesting notes on renewal.
Renewal Leveling Guide
In renewal you cannot kill monsters with too much level difference than yours anymore or else you'll be rewarded with sucky exp. The best way of leveling in Renewal is either to kill MVPs or kill monsters whose levels are 10 levels higher than you, they will be the ones who'll give you a boosted exp of 140% upon successfully destroying one. Although, you can opt to kill monsters which has a level difference of 15 as the maximum. but 15 levels higher would only yield a 115% exp reward. Now how to find out the monsters' levels? Simply open your map (CTRL + `) and then press tab once opened and you'll see a monster name of in the field and a number below it.

Basically, the monster name is the monster which has the highest spawn count on the said map and the number is that monster's level. Or alternatively, you can just check monster levels here.
Exp Tables AdjustmentsIt's now quite easy to reach level 99 even in trans classes due to the major shift in Exp Tables. The challenging part now comes when you are already a 3rd job.
Stats have changed now, such that certain stats like LUK have very big usefulness now as it features a number of pros. Moderate DEX right now would be around 80+ if you want to have less misses when attacking monsters. A full list of stat changes can be seen here.
Skill Changes
A number of skills have changed which in some way would provide more versatility to new rising builds for 3rd jobs. Swordsman in general are the most notable in the skill changes since they really allow more versatile builds now than pre-renewal ones. Two notable of such would be the Crusader's Spear Quicken, which is now usable for 1 hand spears and also provides additional Crit and Flee stats when the skill is active, and the Lord Knight's Spiral Pierce/Clashing Spiral which are now usable with 1 hand and 2 hand swords as well.


Level Caps and Max Stats
Note that the new 150 level cap are only allowed for 3rd jobs when you successfully change into them. Max level of Novices, 1st jobs, 2nd Jobs, Trans Jobs and Expanded Jobs (Ninja, Gunslinger, Super Novice, Taekwon Class) is still level 99.Also the maximum stat points for the said jobs are still 99, only 3rd jobs get the 120 max stat bonus.
Trans made 3rd Jobs versus 2nd job made 3rd Jobs
In order to be a 3rd Job, you either need to be a 99/50 Second Job or at least a 99/50 Trans class. So what are the odds of when these 2 different jobs collide in battle? Basically the one that came from a Second Job loses big time. Why? When you trans you'll lose the excess unneeded stat points from when you created one such as 16 unneeded points for AGI/LUK for Wizards when you created the character, aside from that Trans Classes have 25% higher HP/SP than normal 2nd jobs and have 52 additional stat points to benefit from. Last but not least, are the very good skills you get from Trans Jobs like an LK's Spiral Pierce, SinX's EDP and Soul Destroyer, Stalker's Preserve skill and many more.
Anyway, that ends my guide for Renewal, you can read more online if you need more info as I've covered only some noticeable highlights.

Wednesday, May 19, 2010
Hong Kong Hauls

Total hauls from Hk...
I'm back in the Failippines and before you conclude anything...
Not all of the ones above are mine, see the rest of the post for a break down loool! (as well as some HK shops guide)
Not all of the ones above are mine, see the rest of the post for a break down loool! (as well as some HK shops guide)
Like I said in my previous post, Hong Kong is a nest for Bandai, most especially Tamashii, items. Well, to sum up, me and my sis found the nest of anime pvc figures quite late, so... I ended up mostly with Kamen Riders. Here are my figure hauls first:

Well, the first day we went there, the first mall we went to was CTMA in Mongkok near Nathan Road, and since it was kinda late already, some shops were already closed but quite a few ones were still open and since it was the first night, I had to resist spending first, but I saw a particular VERY high priority target from one of the closed shops. It was SIC Knight and Ohjya, really REALLY good a price for something really rare online, so I got it the next day :D and we went to the neighboring shop as well called Animate, you should see it when your taking the escalator up the CTMA mall, it should have a huge Gundam and Ultraman at the window placed at the second floor. Unable to find something good, I decided to get Zolda and Taiga the following day since some of the malls I've been told were already missing probably replaced through the years that passed. Before I got Vol. 27, I hesitated whether to get it or the Kuji Wedding Dress Kallen, but Zolda had a higher weight since Zolda and Taiga, in the long run, will for sure be harder to find and much more expensive.
I thought those 2 would end my HK hauling but from the shop that sold the Kallen, there was the Kuji Anya and I really like Anya the most out of the Geass girls, so, I had to get one since it doesn't look like companies are planning to make a large fig of her soon. Then weekend came, my sister bought a hobby magazine in Hong Kong, and listed there were some more stores in Mongkok so, we went out after eating dinner Saturday night from a tiring day at Disneyland to look for those shops and there... I encountered the vignett Mikus from Sega at a shop in Sino Centre, just found behind the CTMA mall in Nathan Road, and since it was a bargain even though they were sold as a set, I bought it, thinking I could sell Rin and Luka in the long run. So there, lastly before we left, I returned for the Kuji Ranka and that's it for my figure hauls. XD
Moving on, here are a few more extra hauls which are non-figures:
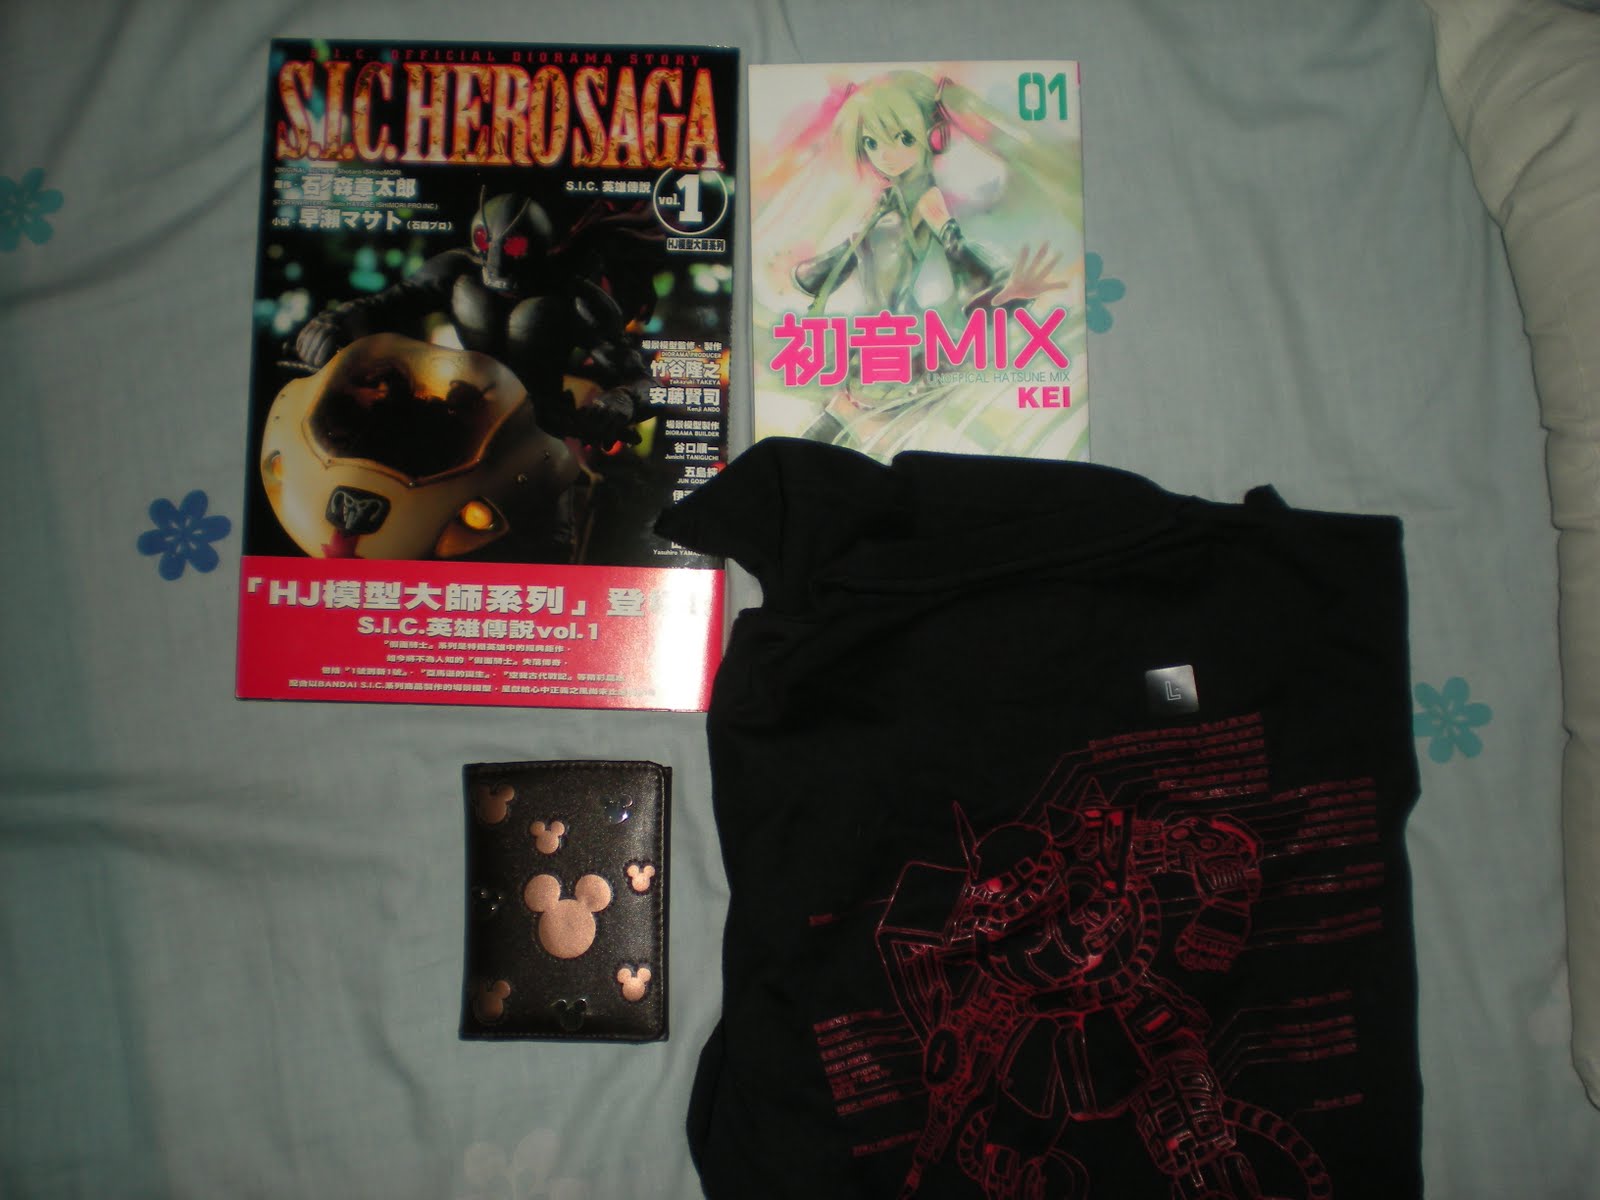
As I've mentioned above, we went to disneyland and I saw this Mickey wallet which I really liked, and luckily, my sis gave it to me! 8D At least I have a new wallet now after n years. The Hero Saga mag was also given to me by my sis, and the dioramas were really amazing! The Hatsune Mix manga is a HK translated one so it's easier to read somehow and since it wasn't that much, I bought it XD Last but not least is actually my first haul, the Zaku II shirt, I like Char's Zaku and that was reason enough for me to get it :))
Now moving on to things not mine :p

The two above are gifts: RX to my friend fifthstitch while the PPP Macross Frontier are for some good friends at Otakai while the rest are free to those who can see me first at GH on Sat from the Otakai community.

Lastly, these are some figures that I bought for some Otakai friends, of course, they have to pay me for these with added small service charge :p Anyway, the brown one is SHF Rising Ultimate Kuuga (Black Eyes version)
Friday, July 10, 2009
Project Diva: Murakami's Tips and Tricks

Have a fun time with Miku
Along with her pure moeness in her game.
After almost 2 weeks of enjoying Miku's very very VERY moe game for the PSP, I think it's time I give some personal tips and tricks to this game... Anyway, if you're reading this, you should hear star story playing, plant that on your head, LOL. That's one of the best songs featured first in this game.

Miku gives off a kind of feeling...
Take it Easy!
Costumes, costumes and more MOENESS!
Guuuureito!!!
Yes, one of the first things you have to do is to try and unlock all songs. I'm not insulting expert-know-it-all gamers out there but if you're entirely new or even if you're familiar with Rhythm games, take this game, run through all songs at easy difficulty. Why easy? The game's pretty easy actually even in hard difficulty songs except some 2 to 4 songs, anyway, playing easy will easily let you breeze through and unlock all songs in a matter of time. But don't take easy mode lightly, as much as possible, have your adaptation to game by playing the easy ones and as much as possible score a Great and get to 100+ combos or even try to rank perfects while breezing through the easy mode.
Costumes, costumes and more MOENESS!
Unlocking the costumes is the greatest challenge of the game, the last costume can be unlocked by getting a Great on hard modes of all 39 songs. Costume unlocking can be cheated, but in the same time it helps, the EASY rule still sticks, usually, the requirement 2 of the costumes require you to play a song 5 times on any given difficulty or score a 100+ combo chain or score high points. Usually, if you'd breezed through the easy mode, you should be somewhat familair already with the songs and their varying speed. I prefer the combo requirement on easy mode, it always works although for the 5 times clear, I prefer it to play at normal difficulty, while you're at it, try to score a great to unlock the hard. Normal and Hard are very similar to each other, only major difference is that you press all 4 buttons at hard.
Guuuureito!!!
One major tip to get the score require and achieve great if you missed the perfect chance already is to focus yourself. Trust me, it's ok to land a few safe, bad and worst and you still have a chance to pull off on achieving great. One of the best tips I can give here is to keep on chaining or even if you miss at times, just keep up, the biggest great factor depends on the "chance time start", the very trick to get overwhelming scores would be to perfect the whole combo chain for the chance time start, as in no combo break as soon as the chance time appears, if you manage to pull off a complete chain, you'll get a total point boost usually enought to fire up your points to achieving great.
~Kimi ni utau suta story~~~

Advice from yours truly, King Mikutard I
Anyway, that's that hope that helps. Enjoy the Star Story music by kz ^^
If you're not Mikutard enough, you'd probably be hearing a lot of new songs if you haven't been visiting the sega Project Diva site while waiting for its release. One best advice I can give is on your easy run or even during costume unlocking, score a great at any of the two difficulties, achieving great allows you to unlock the PV of the song, by pressing /\ button on the song select, you can view the PV and watch Miku dance, the real trick here is that if you don't have anything to do at the moment, replay the PVs again and again, not because of Miku overload but to be familair with the song or the music. The notes follow how the music flows, that's why me almost being familiar with more than 1/2 of the songs in the game had a breeze in playing any level since I've most likely memorized the music already. On a different note though, when I play this game, I always get more focused when I play this with earphones at max volume, lol.
Anyway, that's that hope that helps. Enjoy the Star Story music by kz ^^
Monday, June 8, 2009
Studio and Camera Setups

Rimu-chan moments =3
Well, I've already posted a guide on mini-studio setups in my main lair, which is my multiply site. But anyway, I hope this can be a more concrete guide. ^^ Well, I'll start off with the studio setup, basically you can setup a studio with two illustration boards, some desk lamps, some paper or the like for multiple backgrounds and of course a camera. Basically, my setup looks like this.

As you can see, those are what I use when I take photo shoots, two illustration boards, one for the surface and one to act as a wall. Clamped to it is a silver crepe paper to add some textured background for a figure, you also see two flexible desk lamps that I use, and on the side are two mini-tripods, I change from time to time since it depends on the angle and the size of the figure.
Basically, black is pretty much a jack of all trades, it can be a default background for almost any figure you plan to take pictures of. But it doesn't hurt to buy some cheap papers that can be used for backgrounds so you'll always have choices for your figures to make them stand out even more. As for me, I have quite a few but still lacking other usable colors:

With proper combination, it can look like this when fired up:

Now that the studio discussion is done, time to head for the camera, I'm not really familiar with cameras that much and I'm using a digital camera for my figures, but it's lovable enough for me. I'm using Nikon COOLPIX S210, a camera of my sister, hehe. Well, I'll be discussing how I set it up to produce those shots uploaded at my multiply. Hopefully, other digi-cams have the same functions so it can be of help to some. Anyway, sorry for the quality of the next few images since they were taken using a cellphone camera. Anyway, to start here's the camera I use.

Well, first few things about this camera is that the aperture is automatically adjusted by every zoom you make. Next, one of the major useful factors with taking pictures in this camera is to have the macro mode turned on. Macro mode option can be seen by pressing the flower like symbol beneath the ok button. On the side note, macro mode only works with the first two zoom options in this camera.


Another one if the exposure compensation, it controls the amount of light you take in, I'm pretty sure that it's not brightness since the camera has a separate menu for brightness. I usually leave it at -0.7 but occasionally shifts it the photo proves it's pretty dark. Exposure menu is accessed by pressing the +/- symbol next to the ok button.


Now to the major factors of the photo:
There's a menu button on the lower left, by pressing it you access the menu to change the ff. major factors: ISO, White Balance and Color Options, while there are still other options left, they do not affect the shot that much compared to the 3 I mentioned.

White Balance:

White balance from my experience is the most major factor in the photos that I shoot, it adjusts the colors depending on the surrounding, while there are pre-defined surrounding setups, I prefer to have it adjusted manually. This is done by selecting Preset Manual and usually the trick is point it to a well-lited black surface, then press ok, this should fix the colors properly now, but if you don't want to, you can always just select Fluorescent or Auto since they pretty much do well already.

Basically ISO helps you if you're having blurry shots, although, you need to set the ISO to a higher value meaning, it'll produce a lot of noise in the picture, making it grainy. I best suggest the ISO to be set at the lowest possible setting to have very more crisp shots. Anyway, with a mini-studio in hand, you won't have much problems with brightness already. And if you have the help of tripods, better use the lowest ISO.
Color Options:

This is determines the basic color setup, I usually set it to vivid color since it produced more lively colors on the photo compared to standard, which basically sets it to the real colors you see on your subject. Depending on what you want to do, you can choose black and white, sepia, etc.
Well my setup is as follows:
Macro mode: on
Exposure Compensation: -0.7
ISO Sensitivity: 60
Color Option: Vivid
White Balance: Preset Manual
Macro mode: on
Exposure Compensation: -0.7
ISO Sensitivity: 60
Color Option: Vivid
White Balance: Preset Manual
Final advise would be if you don't know how to work around with your camera that much, play around with them and read the instruction manuals for help. ^^
With those and proper lighting and mini studio setup, you can produce photos like these:


Hope this helped in any way, well, what are waiting for bring out those moments with your collection. ^^

Waifu's moment in one of her endings.
Subscribe to:
Posts (Atom)


